Web learn the how to tie a crochet slip knot with this simple and easy tutorial from love.life.yarn. To begin, we will hold the slip knot between our thumb and pointer, in our left hand. Web this stitch is worked in rows in this tutorial and it may be worked in one colour or many. Web a slip knot is the knot that is used to attach your yarn to the crochet hook. Tighten the loop until it's secure on the hook.
Learn easily how to make slip knot crochet to start working any crochet pattern with the detailed photo instructions below. Web how to do the slip knot to start a crochet work and how to do the chain stitch. The long end of the yarn is wrapped around our middle, ring, or pinkie on the left hand as well. Here's a video, written instructions with photos, and some tips. Web when you're following the instructions of your first crochet pattern, and counting the stitches of your foundation chain, don't count that slip knot!
The chain stitch is the simplest of the crochet stitches. Hold the tail and pull on the working yarn to tighten the loop on your hook. What this means is that you need to make x number of starting chains. Then you can start your chain. Try to work neatly, creating small v shapes and practice before this before moving on,.
Slip Knot & Chain Learn To Crochet Series • Green Fox Farms Designs

How to Make a Slip Knot and Chain Amanda Crochets

How to Slip Knot and Chain Crochet Lesson 1 YouTube

Tying Slip Knot Starting Chain Crochet YouTube

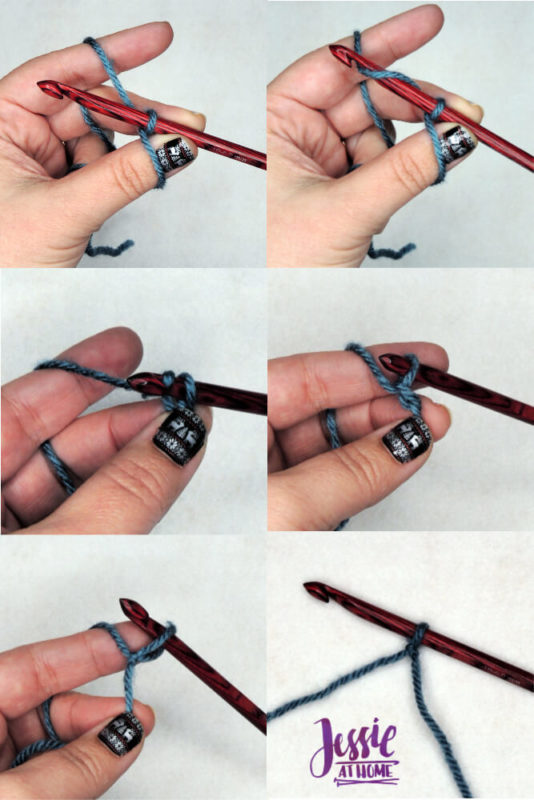
Slip Knot and Crochet Chain The First Steps to Crochet Jessie At Home
Crochet Starting Knot Variations

How to Make a Slip Knot for Crocheting and Knitting Slip knot crochet

How To Crochet Chain Stitch For Beginners Amanda Gregory's Coloring Pages

Crochet Tutorial How To Make A Slip Knot The Purple Poncho

móhu — slip knot and starting chain

For this stitch you will need a multiple of 2 + 1 stitches for your foundation chain. The long end of the yarn is wrapped around our middle, ring, or pinkie on the left hand as well. Once you have mastered chaining, the rest is easy peasy! Here's a video, written instructions with photos, and some tips. What this means is that you need to make x number of starting chains. The slip knot is how you attach the yarn to the hook. Learn easily how to make slip knot crochet to start working any crochet pattern with the detailed photo instructions below. Try to work neatly, creating small v shapes and practice before this before moving on,. A slip knot is important to master because it is the first step taken when. I’ve created a comprehensive guide on how to start crocheting and included not one but two video tutorials. Web in this beginner how to crochet video from annie's, you'll learn how to make a slip knot and chain stitch. Learn how to make a slip knot and start a crochet project! Web pull on the tail to make the loop smaller, or up on the loop to make it bigger. Web when you're following the instructions of your first crochet pattern, and counting the stitches of your foundation chain, don't count that slip knot! Web how to do the slip knot to start a crochet work and how to do the chain stitch.
Web How To Make A Slip Knot.
Before you can get to making those starting chains, you need to make a slip knot. Web this stitch is worked in rows in this tutorial and it may be worked in one colour or many. To begin make a slip knot and make a foundation chain. Before we can start crocheting, we need to make a slip knot and put it on the hook.
Includes Both Photo And Video Tutorials.
You can now insert the loop onto your crochet hook. The first step of any crochet project is to make a slip knot on your hook. Web in a crochet pattern, the instructions usually begin with “chain x” with x being a number. This pattern is written using american crochet terms.
I’ve Created A Comprehensive Guide On How To Start Crocheting And Included Not One But Two Video Tutorials.
Web the knotless starting chain is an alternate technique for starting that first stitch off your crochet hook. Web the first step of any crochet project, learn how to make a slip knot then continue on to create a foundation chain (ch). It is made by creating a simple loop at the start of your yarn, inserting your hook into the loop, and then pulling the loop tight against your crochet hook. Use a slip knot to attach the yar.
Learn How To Make A Slip Knot And Start A Crochet Project!
Lift the lower wrap over the upper wrap but keep it on your finger. Web to start a crochet chain, we make a slip knot (see above). Once you have mastered chaining, the rest is easy peasy! Video tutorials for both methos of slip knots!